Showing posts with label craft projects. Show all posts

Saturday, June 11, 2011

Self-tanning Ganache

My husband was humming, "It's beginning to look a lot like Christmas."


His merry tune was less to do with the cool June weather and more to do with the snowy white complexion of my legs.


I am white as a sheet these days. I look around and see tan people, I envy them, but I know they did one of three things to become bronze instead of sheet-like. (Or they aren't causation, having darker skinned ethnicity would really help).


1) Fake and bake, ya, they tell us it is horrible for you, but it gives the glo and what is more fun than laying na-ked in a spaceship-like thing? 

2) Real sun, zero days over 80 degrees in 9 months in the NW, I know they must have been on an exotic vacation. 

3) Tan in a tube, it stinks but gives the elution of darker skin, what's not to love? Oh ya, the smell and the nasty chemicals.


I've participated in the above three bronze-achieving activities in the past. I'm not ashamed to admit it. I love the look of tanned skin. I'm with my husband on this one -- I think the color white should be reserved for wedding dresses, snow, and refrigerators.


My recent lotion making adventure had me wondering if I could make a chemical-free self-tanner in a tube. With dreams of deep, dark, skin, I turned to Google for advice. They came up with the reoccurring suggestion to use cocoa powder.


What did I have to lose? 


Well, maybe my pride.


I mixed equal parts cocoa powder and vanilla spice lotion (homemade).


It was way too thick, so I added twice as much lotion.


I ended up with a ganache-like consistency that smelled delicious. 


And I was very hungry and repulsed at the same time.


I smeared it on my pasty-white leg.


I think the results are quite natural looking.


I was hoping to perform this experiment in private and then Mandy got up from her nap.


Her running dialog went something like this:


"What are you doing?


Is that frosting?


Why are you putting frosting on yer-self?


Can I put frosting on my-self?


Can I lick your leg?"


I decided the "bronze cocoa" tan was a bit much.


Just a bit.


So I wiped it all off.


I tried and tried and tried to take a non-creepy picture of my legs. Really I did. It is impossible.


The leg on the left is cocoa-ed. The leg on the right is white as snow. Do you see a subtle difference?


"It's beginning to look a lot like Christmas....."


The chemicals are nasty in regular self-tanners and they stink.


Yet, they work.


My review of the cocoa powder lotion?


The all-natural formula didn't actually work, took about half an hour to apply and then wipe off, and I had to shower before I went to bed because other reviewers said the un-tinted residual left on my skin would come off on my bed sheets and stain then. How ironic.


Looks like the only solution is an exotic vacation to the sun with plenty of time to lay around and eat ganache.


Exotic vacation to Mexico in November of 2009.


My skin color matches a newborn. I guess all that sun didn't help.


Because I was looking at Mexico pictures and found this.....


And suddenly I don't care any more that I'm not tan....


Or that I have Christmas songs running through my head in June....


Or that I just posted creepy pictures of my legs on the internet.


Have a beautifully pale day,


Photobucket

Monday, June 06, 2011

Homemade Lotion

Yesterday I learned how to make lotion! This is a whole new level of Granola Mama. It was a tremendous amount of fun and I found yet another thing want to do the "natural way."


Last month my Secret Sister at church gave me a sampling of four lotions. She told me later that her (real) sister made the lotions. What surprised me the most about the homemade cosmetics was that they weren't a lesser quality than something I would buy in the store. Rather, this lotion was much better! The texture is perfectly smooth, absorbs quickly, not greesy, the scents are light, compelling, and delicious, and the benefits I see with my skin are the most fantastic. I've suffered with psoriasis (chronic skin condition) on my hands for 8 years and there are a lot of things that make it worse, but nothing that makes it better... Until now. Also, the normal itchiness I always get on my legs after I shave doesn't occur when I use this all natural lotion.


I'm a believer! I asked my friend if her sister would be interested in teaching me how to make the lotion and she agreed. I was so excited and a friend and I learned yesterday what goes into making an all-natural quality lotion.


I posted a quick sentence about my lotion making experience on fb and was surprised at the number of people who were interesteed in the process. I'll post here what I learned yesterday.


While making lotion is not labor intensive, it takes a lot of odd ingredients (definitely special purchases) and quite a bit of time. It is science and art, a combo I love. The amounts of ingredients need to be exact in their ratios so the texture comes out right, but the scents are all art. Combining the essential oils, which have healing properties of their own, was tons of fun. I made a lavender oil blend that smells earthy sweet and a mint medley that is fresh clean smelling and my husband doesn't mind using it.


The basic recipe for 2 cups of lotion:


27g solid, like Shea butter, cocoa butter, or kokum
85g oil, you can really go crazy with all the veggie, fruit and plant oils
8.7g stearic acid
19g emulsifying wax


330g water
2g citric acid (preservative)


Use a food scale to measure ingredients, tare after each addition and it is easy! Heat oils and butters in short bursts in the microwave until hot and melted, stiring with a wooden spoon. Heat water and citric acid to the same temperature. Use a hand mixer in the oil with one beater and slowly pour the water in while the mixure is going. Combine for about a minute. Then stir the mixture every few mintues as it cools when it begins to separate. It takes about an hour to cool down to room temperature. It starts to thicken up, but won't be the final thickness until the next day. 


The essential oils and herb extracts are added next. In my lavender mix, I used things that are specifically mentioned for treating psoriasis like tea tree and ylang ylang. The possibilities are just endless and you mix a few drops of this and that in a tiny container until it smells pleasant. Then you add that to the lotion, it is less than a quarter of a tsp. -- the amounts are SO small to infuse a small amount of lotion.


I also learned yesterday that you can make the lotion into a sun block by adding two more ingredients after the essential oils. They are 1 TBS powdered zinc oxide (a natural mineral that block sun -- it's the main ingredient in diaper rash creams) and 1 TBS powdered titanium dioxide (a chemical compound made from a mineral).


The fun thing about doing this project at a pros house is that she had TONS of stuff to work with. She had about 8 different oils to choose from, 4 butters, and about 25 essential oils to mix and match. She spends $100s on her online orders, but it is her passion and she blesses her friends and family with salves, lotions, and bath salts that are healthy and healing.


I came home pumped up and excited about doing this project myself and went to the websites recommended at the class. The oils and butters are not terribly expensive and I could buy enough to make about a gallon of lotion (plain) for less than $50. The essential oils and getting a variety of them are the expensive part. For example, sandalwood is $100 an ounce. There are so many recipes online to choose from and many just add one or two essential oils to make a pleasant scent, so you can do it affordably.


www.thesage.com, their blog is really fun: www.blog.thesage.com

www.fromnaturewithlove.com

www.libertynatural.com

www.organic-creations.com

www.mountainroseherbs.com


I'm really excited about this idea of making lotion. I didn't rush out and make a huge order, but I am definitely give it some more thought and research.


What do you think? Would you ever try to make it yourself?


Photobucket


PS This week I plan to try an all-natural self-tanner on my pasty white legs. Stay tuned for before and after pictures. :)

Wednesday, March 30, 2011

Easiest Pillow Cover how-to

Mine (insert was an old pillow I had laying around, $3.50)


Pillow covers are easy to make and solve so many problems in my life. When I am bored of a room, changing the pillows puts my soul to rest.


PB Essential Cozy Pillow Cover
Pottery Barn (insert not included, $25)
If you can sew a straight [ish] line, you can sew a pillow cover. Pottery Barn charges $25 for a 18" pillow cover, but you can make one for the cost of about half a yard of fabric.


Click "read more" to see the full directions.


Wednesday, January 05, 2011

$1 Bulletin Board

[jill4.gif]


BHG inspired me with this picture of framed bulletin boards.


I've been thinking about it for more than a year, looking for a good frame and throwing ideas around in my head about what would work for the backing.


The frame is another second-hand find.

$1.


I used two layers of cardboard for the "bulletin board" backing.


I still had lots of the old burlap that Jeff found in the barn and I used it to cover the cardboard.


Hot glue came through for me again. 

Gluing right along the edge first and then folding the fabric in made a finished edge. Just in case anyone is looking at the back of my frame.


I stuffed the covered cardboard (which was even sturdier than I thought) into the back of the frame. A little glue really holds it in place.


I think my office is as done as it going to get, so look forward to a reveal tomorrow.


Photobucket

Tuesday, December 28, 2010

A deal I couldn't pass up.


I have a hard time paying full price. A good deal is a rush. I was at Old Navy and found a clearance shirt for really cheap. Really, really cheap.


Marked down to $1.47


The problem was my new mantra: if you don't need it, don't buy it!


I tried the shirt on, a nice white button-down, and I looked like a waitress. 


But it is $1.47!


You will never wear the shirt and it will be a $1.47 mistake.


But it is SO cheap.


Don't buy something you have no purpose for.....


Thinking of re-purposing the shirt made my head spin. What could the shirt be in another life?


Remember this post about the jammies turned pillow?


I wanted to make a couple of pillows out of the remaining fabric from my curtains.


I decided to use the shirt front as the back of the pillow where I would need to make a closure anyway.... buttons and placket saving me the work. And the plain back of the shirt would be the lining under the curtain fabric.


I used a pillow form I had from a time gone by.


And drew a square on the front of the shirt 1/2 inch larger than the pillow form to allow for 1/4" seams.


Thank you Fellowship of Christian Farmers for the free ruler. It was a great help in my project.


This guy was a helper too. Need a ruler, pen, measuring tape, or scissors? He'll run off with them on the double. I'm hoping this is the beginning of a servant nature.... not just a naughty nature.


Still the project took only 30 minutes.


I used a seam-ripper to take off the pocket.


This is the curtain fabric. I just cut it the same size as the shirt/square and pinned the lining to the front so I wouldn't get confused.


Right sides together with the left-over tab tops from the curtain sewn in the corner. It was a design gamble, but I am happy with how it turn out. Very shabby-chic.


I unbuttoned the back of the pillow (the front of the shirt) and inserted the pillow form.


And the back:


Thanks to the old-navy shirt for making a cute pillow possible!


I found this picture of some beautiful bedding from Ethan Allen:


Take a gander at the price of the throw pillow pictured on the middle of the bed....


$119.00


$1.47 plus a few scraps. I love a good deal.

Photobucket

Friday, December 03, 2010

25 days of attempted crafts: Card-Table Tent

For today's craft, I hope my nephews aren't reading my blog. Those kids! It is only inevitable that some Christmas gifts will be showcased here and that is really the point. It is to show that yes, you can make awesome Christmas gifts that won't have them crying for a Toy's R Us gift card for next year.


Or at least that's goal.


The Card-Table Tent is inspired by my husband who has such fond memories of the one he played in as a child. The concept is a fitted blanket that fits over a standard card table. It can be made as ellaberate or simple as your time will allow.


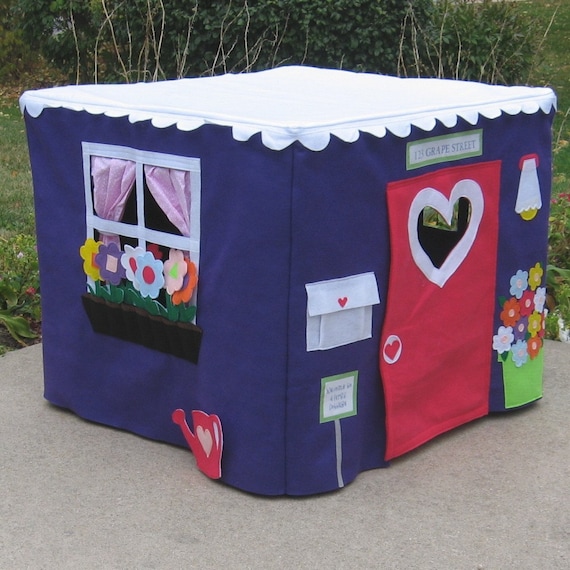
Knee High Cottage Card Table Playhouse, Royal Purple, Personalized, Custom Order


This card table fort is for sale on Etsy by seller missprettypretty for $195. Amazingly cute.


Card Table Forts


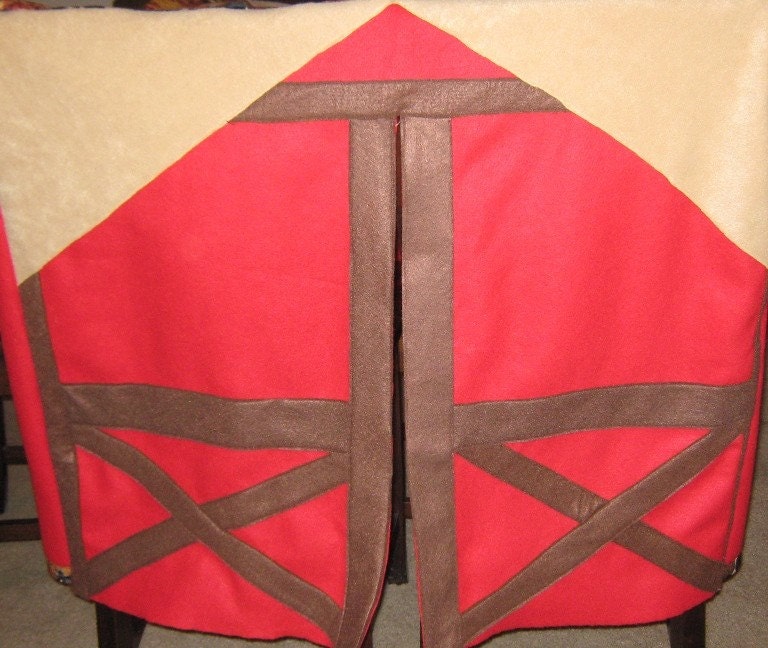
This barn design is similar to the one my husband remembers from his childhood. It is only $35 on Etsy from seller whippersnappersgifts... a great deal now that I have made one and know that it is a pretty time consuming project.


Now on to the creation of my own.... er... for my nephews.


I purchased a 6'x9' canvas drop cloth ($10 @ home desperado) and the pieces fit perfectly. For once my shoddy math skills didn't let me down. You could use fabric by the yard too, I think you would need about 5-6 yards, but don't quote me on that.


I measured the top and cut a piece 1" bigger to allow for a 1/2" seam allowances. For the sides and back I did the same measurements, but used the finished sewn edge of the drop cloth for the bottom portion so I didn't have to hem it (I only allowed for 1/2" seam allowance).


The finished edges were great! If there is a short-cut.... I'll take it.Hence, my love for hotglue.


I made a front flap that over-laps by 3". I like this better than any of the roll-up options I saw on other tents.


Good ol' velcro holds the tent flaps back.


So, here is the tent with the flaps back. It would have been the easiest project ever (like I envisioned before hand), if it hadn't been for the window.


The concept designer (aka, husband reliving his childhood) said a window was absolutely necessary. I used some wide mesh cut in an oval shape and couldn't figure out to really finish the edge in a nice-looking way on both the inside and outside. That's why I'm not showing you a close-up. 


For the next 22 nights I will have nightmares about my nephew opening his awesome tent on Christmas and saying, "Wow, what happened on the window stitching Aunt Alysun?"


I have a few more of these to make, so maybe the next ones will have perfectly executed windows. 


A girl can dream.


Photobucket


* Amazingly, no hot glue was used in this project.